
0
Owner's of the ADTRAN Switch NETVANTA 1200 POE gave it a score of 0 out of 5. Here's how the scores stacked up:

Unit Installation NetVanta 1000/1000R Series Hardware Installation Guide
58 Copyright © 2008 ADTRAN, Inc. 61200500L1-34N
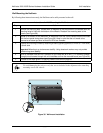
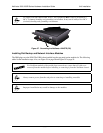
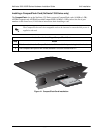
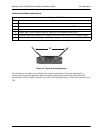
Figure 38. Installing DIMs
Instructions for Installing the DIMs
Step Action
1 Remove power from the unit.
2 If the NIM is already in the NetVanta chassis, remove all cables, release the pins at both edges
of the NIM front panel and slide the module out of the chassis.
3 Carefully align the P1 connector on the NIM with the J1 connector on the DIM. Using only fingertip
pressure so that neither circuit board bends or flexes, ensure that the connectors are firmly seated.
Secure the DIM to the NIM using the screws and standoff posts supplied. See Figure 38.
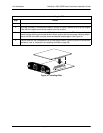
4 Slide the NIM with the DIM attached into the NetVanta chassis, continuing with the normal NIM
installation (refer to Instructions for Installing the NIMs on page 59).


Find Your Products By Category
- TV and Video
- Communications
- Personal Care
- Portable Media
- Computer Equipment
- Home Audio
- Household Appliance
- Car Audio and Video
- Kitchen Appliance
- Fitness & Sports
- Musical Instruments & Equipment
- Power Tools
- Marine Equipment
- Lawn and Garden
- Automotive
- Photography
- Video Game
- Laundry Appliance
- Outdoor Cooking
- Baby
- Cell Phone
Please Login
