
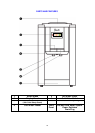
0
Owner's of the Avanti Beverage Dispenser WDTZ000 gave it a score of 0 out of 5. Here's how the scores stacked up:


7
OPERATION INSTRUCTIONS:
Before Using Your Water Dispenser
Check to be sure the following parts are included:
Instruction manual
2 extra cup dispenser cabinet plugs (Located in the bag with this manual)
2 extra drain seals (Located in the bag with this manual)
Accessories order form.
Before connecting the appliance to the power source, let it stand upright for approximately 2
hours. This will reduce the possibility of a malfunction in the cooling system from handling during
transportation.
Remove the bottle stabilizer ring (IF SUPPLIED) from the top of the water dispenser as this
part is not needed when using the ZeroWater bottle kit. This part is only used for delivery
type water bottles.
The water dispenser is pre-cleaned at the factory but the reservoir and water lines must be flushed
with fresh water before use as follows:
Keep the unit unplugged.
Fill water tank with tap water full to capacity. Wait for 15 minutes as indicated above.
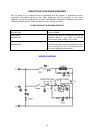
Slide child safety button then push the hot water faucet (See the Hot Water Faucet diagram on
the next page) until water comes out, then stop.
Plug the dispenser into the electrical outlet. Locate and flip the COLD (Green) and HOT (Red)
power switches at the rear of the unit to the ON position.
We are ready to complete the first cycle. In order to do that, wait for the hot water to reach
temperature in approximately 10 minutes, and then wait for the cold to reach temperature
(another 40 minutes, approximately).
Warning: The water coming out of the back may be scolding hot
Flip the COLD (Green) and HOT (Red) power switches to the OFF position.
Unplug the dispenser from the electrical outlet. Proceed to drain the water from the faucets one at
a time until no more water remains. (Note: To facilitate this operation, use a large container).
Then, drain any water left in the tanks by opening the drain plug located on the back, until it drains
completely.
Proceed to close the drain cap tightly and ensure there are no leaks.
Push water faucet buttons to insure water flows from both faucets.
Plug dispenser back into the electrical outlet.
Flip the COLD (Green) and HOT (Red) power switches to the ON position.
Now you are ready to use your water dispenser.
NOTE:
Your water dispenser has been cleaned and sanitized before leaving the factory, but in case a taste
problem develops, remove the ZeroWater bottle kit and place two tablespoons of baking soda directly
into the water intake and add tap water and repeat basic operations previously outlined, except turn
hot water switch “OFF” to avoid leaving residues in hot water tank. Once you have flushed the water
cooler, replace the ZeroWater bottle kit and fill as indicated above.
BEFORE TURNING YOUR WATER DISPENSER POWER ON
Fill the Zerowater Bottle with tap water and wait approximately 15 minutes for
the water to filter into the water dispenser before turning your water dispenser
ON.


Find Your Products By Category
- TV and Video
- Communications
- Personal Care
- Portable Media
- Computer Equipment
- Home Audio
- Household Appliance
- Car Audio and Video
- Kitchen Appliance
- Fitness & Sports
- Musical Instruments & Equipment
- Power Tools
- Marine Equipment
- Lawn and Garden
- Automotive
- Photography
- Video Game
- Laundry Appliance
- Outdoor Cooking
- Baby
- Cell Phone
Please Login
