

0
Owner's of the Black & Decker Chainsaw Sharpener Black & Decker Saw gave it a score of 0 out of 5. Here's how the scores stacked up:

4
OPERATING INSTRUCTIONS
WARNING: Shock hazard. Under no circumstances should this product be used near water.
WARNING: Risk of lacerations or burns. Do not touch work piece or blade immediately
after operating the tool. They can become very hot. Handle carefully. Always allow accessories
and work piece to cool before handling.
WARNING: To reduce the risk of injury, turn off and remove battery from tool or disconnect
plug from power source before making any adjustments or removing or installing attachments or
accessories.Remove any accessory from the attachment before removing or installing the attachment.
NOTE: Refer to Power Unit instruction manual before operating this tool for all safety warnings
and details on installing and removing attachments.
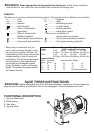
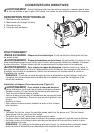
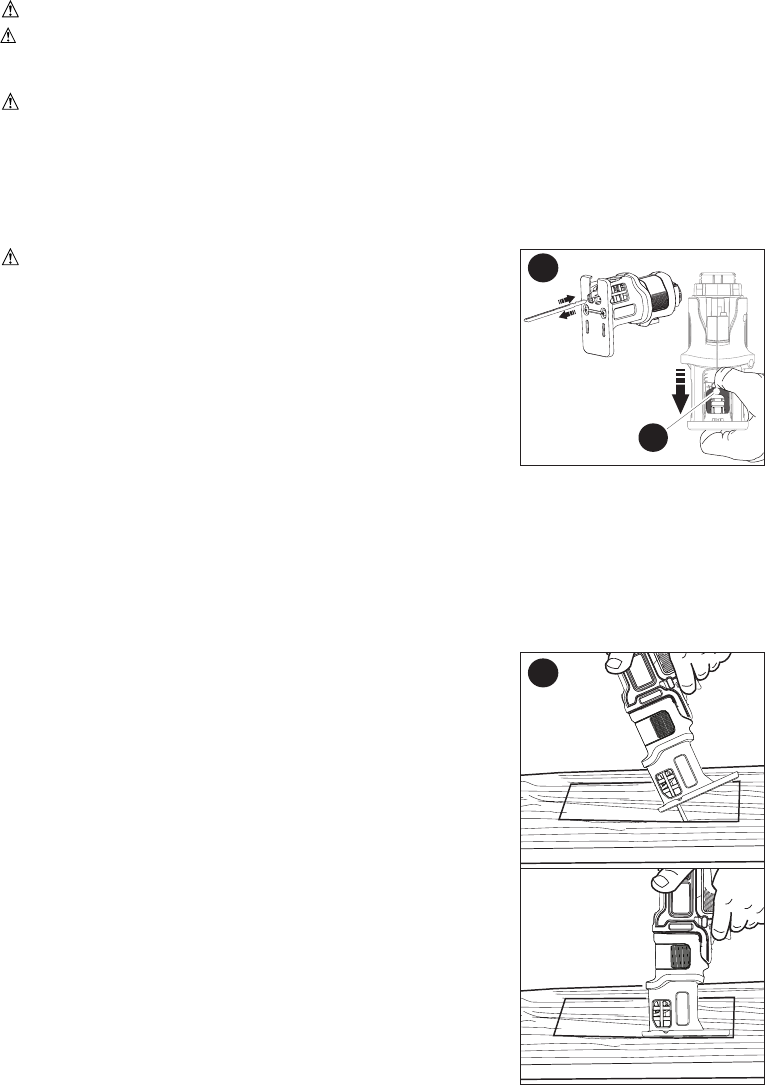
INSTALLING AND REMOVING A SAW BLADE (FIGURE A)
WARNING: To reduce the risk of injury, turn off and
remove battery from the tool or disconnect plug from power
source before making any adjustments or removing or installing
attachments or accessories.
•Accessthelever(A1)throughthebackofthejigsawattachment.
•Pressandholdtheleverdownwithyourthumb.
•Insertthesawbladeintothebladeclampasshown.Make sure
the teeth are pointing toward the slot opening in the saw shoe.
•Releasethelever.
•Toremovethesawblade,pressandholdthelever (A1) down
and pull the saw blade from the holder.
SAWING
• Toswitchthetoolon,pressthevariablespeedswitchonthepowerunit.Thetoolspeed
depends on how far you press the switch.
• Toswitchthetooloff,releasethevariablespeedswitch.
• Alwaysusetheappropriatetypeofsawbladefortheworkpiecematerialandtypeofcut.
• Ifnecessary,drillaholeintheworkpiecenearthestartingpointofthecutsothebladewillfit
before starting the cut.
NOTE: This attachment only operates in the forward direction, the forward/reverse slider of the
Power Unit should not be able to be switched to reverse.
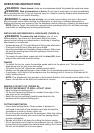
MAKING A POCKET CUT (FIGURE B),
IT IS NOT NECESSARY TO DRILL A PILOT HOLE:
• Markthedesiredstartingpoint.
• Tiltthetoolforwardandplacetheroundedfrontedgeofthe
saw shoe on the workpiece.
• Switchthetoolonandslowlyfeedthesawbladeintothe
workpiece at the desired starting point.
CUTTING SHEET METAL
• Useametalcuttingblade.Clamp a piece of plywood or
soft wood to the back of the workpiece and saw through the
combination in order to obtain a clear cut.
• Do not force the saw blade into the workpiece. Note that cutting
sheet metal will normally take more time than sawing thicker
wooden workpieces.
• Spread a thin film of oil along the cutting line before sawing.
• To cut, place the front of shoe on the material to be cut. Hold the
jigsawshoermlyagainstthematerialwhilecutting.Don’tforce
the tool; let the blade cut at its own speed.
A
A1
B


Find Your Products By Category
- TV and Video
- Communications
- Personal Care
- Portable Media
- Computer Equipment
- Home Audio
- Household Appliance
- Car Audio and Video
- Kitchen Appliance
- Fitness & Sports
- Musical Instruments & Equipment
- Power Tools
- Marine Equipment
- Lawn and Garden
- Automotive
- Photography
- Video Game
- Laundry Appliance
- Outdoor Cooking
- Baby
- Cell Phone
Please Login
