
0.2
Owner's of the Black & Decker Cordless Drill Black & Decker Cordless Drill gave it a score of 0.2 out of 5. Here's how the scores stacked up:


10
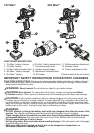
OPERATING: POWER UNIT
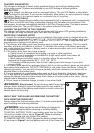
TRIGGER SWITCH & FORWARD/REVERSE SLIDER
Theforward/reverseslider(7)isusedtocontrolthedirectionthechuck(12)spins-fowardto
drive screws, reverse to remove screws. It is located above the variable speed trigger (8). To
reverse the motor, release the trigger FIRST, then push the slider to the right hand side of the
tool when viewing from the rear. After any reversing operations, return lever to the forward
position. Never change the direction of rotation while the motor is running.
• ThePowerUnitisturnedONandOFFbypullingandreleasingthetrigger.Thefartherthe
trigger is depressed, the higher the speed of the Power Unit.
• Aforward/reversecontrolsliderdeterminesthedirectionofthetool.
• Toselectforwardrotation,releasethetriggerswitchanddepresstheforward/reversecontrol
button to the left.
• Toselectreverse,depresstheforward/reversecontrolbuttontotheright.
NOTE: When changing the position of the control button, be sure the trigger is released.
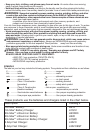
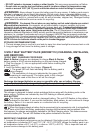
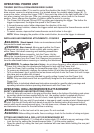
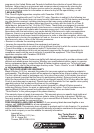
INSTALLING AND REMOVING ATTACHMENTS - FIGURE G
WARNING: Shock hazard. Under no circumstances should
this product be used near water.
WARNING: Burn hazard. Moving parts within the Power
Unit become hot during use. Avoid contact with moving parts
within Power Unit when removing and installing accessories.
WARNING: Before assembly, lock the Power Unit by
setting the forward/reverse slider (7) to the center position and
remove the battery from the Power Unit. Remove any accessory
from the attachment before removing or installing the attachment.
WARNING: To reduce the risk of injury, do not place fingers or other objects inside the
Power Unit, other than the attachments designed to work with the Power Unit.
• Lock the Power Unit by setting the forward/reverse slider (7) to the center position.
• To remove an attachment, depress the release button (9) and take the attachment off the tool.
• Totanattachment,lineitupwiththetoolasshownandpushitontothePowerUnituntilitsnaps
into place and an audible click is heard.
• EnsureattachmentissecurelyattachedbygentlypullingitawayfromthePowerUnit.
NOTE: Only use attachments that are specifically designed for and compatible with the
Power Unit.
NOTE: Refer to individual attachment instruction manuals for specific safety warnings and
operating instructions before operating attachments with the Power Unit.
OPERATING: DRILL/SCREWDRIVER ATTACHMENT
SAFETY WARNINGS AND INSTRUCTIONS: DRILLS
1. Hold drill firmly with one hand on the grip and the other hand on the bottom of the battery pack unless
an auxillary handle has been supplied with the tool. Use auxillary handle if supplied with the tool.
2. When attaching accessories in the drill chuck, hand tighten the keyless chuck firmly.
WARNING: Drill may stall (if overloaded or improperly used) causing a twist. Always expect
the stall. Grip the drill firmly with both hands to control the twisting action and prevent loss of
control which could cause personal injury. If a stall does occur, release the trigger immediately
anddeterminethereasonforthestallbeforere-starting.
WARNING: Let the tool work at its own pace. Do not overload.
WARNING: Before drilling into walls, floors or ceilings, check for the location of wiring and pipes.
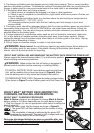
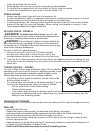
FITTING AND REMOVING A DRILL BIT OR SCREWDRIVER BIT
The drill/screwdriver attachment (11) is fitted with a keyless chuck (12) to allow for an easy exchange of bits.
• Lockthetoolbysettingtheforward/reverseslider(7)tothecenterposition.
• Openthechuckbyturningthefrontpartclockwisewithonehandwhileholdingtherearpart
with the other.
G


Find Your Products By Category
- TV and Video
- Communications
- Personal Care
- Portable Media
- Computer Equipment
- Home Audio
- Household Appliance
- Car Audio and Video
- Kitchen Appliance
- Fitness & Sports
- Musical Instruments & Equipment
- Power Tools
- Marine Equipment
- Lawn and Garden
- Automotive
- Photography
- Video Game
- Laundry Appliance
- Outdoor Cooking
- Baby
- Cell Phone
Please Login
