

0
Owner's of the Black & Decker Cordless Sander BDCMTO gave it a score of 0 out of 5. Here's how the scores stacked up:

5
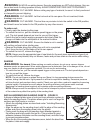
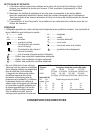
INTENDED USE
DETAIL SANDING
Sanding in extremely tight areas otherwise difficult to reach and require hand sanding. Select a
high oscillating frequency. Sand with continuous motion and light pressure. Applying excessive
pressure does not increase material removal; but will prematurely wear sanding sheets.
FLUSH CUTTING
Remove excess wood from door jamb, window sill and/or toe kick. Removing excess copper or PVC pipe.
REMOVAL WORK
Carpets & backing, old tile adhesives, caulking on masonry, wood and other surfaces.
REMOVAL OF EXCESS MATERIALS
Tile grout, plaster, mortar splatters, concrete on tiles, sills.
PREPARATION OF SURFACES
New floors and tiles.
OPERATING INSTRUCTIONS
WARNING: Shock hazard. Under no circumstances should this product be used near water.
WARNING: Risk of lacerations or burns. Do not touch work piece or accessory
immediately after operating the tool. They can become very hot. Handle carefully. Always allow
accessories and work piece to cool before handling.
WARNING: To reduce the risk of injury, turn off and remove battery from tool or disconnect
plug from power source before making any adjustments or removing or installing attachments or
accessories. Remove any accessory from the attachment before removing or installing the attachment.
NOTE: Refer to Power Unit instruction manual before operating this tool for all safety warnings
and details on installing and removing attachments.
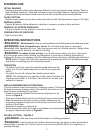
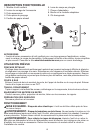
OPERATION
• Toswitchthetoolon,pressthevariablespeedswitchonthe
power unit. The tool speed depends on how far you press the
switch.
• Toswitchthetooloff,releasethevariablespeedswitch.
NOTE: This attachment only operates in the forward direction, the
forward/reverse slider of the Power Unit should not be able to be
switched to reverse.
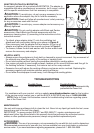
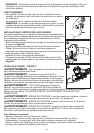
INSTALLING/REMOVING ACCESSORIES
This tool features a tool-free accessory changing system. This allows
for faster accessory changes without the need for wrenches or hex
keys like other oscillating tool systems.
•Graspthetoolandsqueezetheaccessoryclampingleveras
shown in Figure A.
• Cleananyresidualdebrisfromthetoolshaftandtheaccessoryholder.
•Slidetheaccessoryintotheaccessoryholdermakingsurethe
accessory engages all eight pins on the holder and is flush with the
surface of the holder.
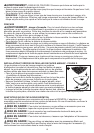
•Releasetheaccessoryclamplever.
• Someaccessories,suchasscrapersandbladescanbemountedat
an angle if required as shown in Figure B.
PLUNGE CUTTING - FIGURE C
WARNING: Hold saw firmly with both hands for all cutting operations.
WARNING: Inspect work area for hidden electrical wiring, gas pipes or water pipes before
making blind or plunge cuts. Failure to do so may result in electrical shock, fire, explosion, or
property damage.
A
B


Find Your Products By Category
- TV and Video
- Communications
- Personal Care
- Portable Media
- Computer Equipment
- Home Audio
- Household Appliance
- Car Audio and Video
- Kitchen Appliance
- Fitness & Sports
- Musical Instruments & Equipment
- Power Tools
- Marine Equipment
- Lawn and Garden
- Automotive
- Photography
- Video Game
- Laundry Appliance
- Outdoor Cooking
- Baby
- Cell Phone
Please Login
