

0
Owner's of the Black & Decker Cordless Saw Black & Decker Cordless Saw gave it a score of 0 out of 5. Here's how the scores stacked up:


8
SAVE THESE INSTRUCTIONS
OPERATION
WARNING: Before attempting any of the following operations, make sure that the tool is
switched off and unplugged and that the saw blade has stopped. Used saw blades can be
hot.
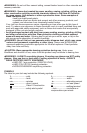
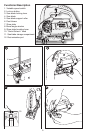
Blade Installation (g. A)
- Hold the saw blade (4) as shown, with teeth facing forward.
- Push the saw blade locking lever (3) downward.
- Insert the shank of the saw blade into the blade holder as far as it will go.
- Release the lever.
- Check to ensure blade is secure before cutting.
Adjusting the shoe plate for bevel cuts (g. B)
WARNING: Never use the tool when the saw shoe is loose or removed.
The shoe plate can be set to a left or right bevel angle of up to 45°.
To set the bevel angle:
- Pull the shoe plate beveling lever (9) out away from the saw to unlock the shoe plate (7)
as shown in figure B.
- Slide the shoe plate (7) forward to release it from the 0° positive stop position.
- The shoe can be beveled to the left or to the right and has detents at 15°, 30° and 45°.
- Set the plate to the desired bevel angle. As you set the shoe angle the amount of
degrees can be read through the bevel angle window (8). Use a protractor to verify angle
accuracy.
- Push the shoe plate beveling lever (9) back towards the saw to lock the shoe plate (7).
To reset the shoe plate for straight cuts:
- Pull the shoe plate beveling lever (9) out away from the saw to unlock the shoe plate (7)
as shown in figure B.
- Rotate shoe plate to an angle of approximately 0° and then pull shoe plate backwards to
engage the 0° positive stop.
- Push the shoe plate beveling lever (9) back towards the saw to lock the shoe plate (7).
How to use the Sightline
®
feature (g. C)
- Use a pencil to mark the cutting line.
- Position the jigsaw over the line (14).
Viewing from directly above the jigsaw the line of cut can be easily followed. Should this
view be restricted for any reason, the indent (15) can be used as an alternate cutting
guide.
Switching on and off
- To switch the tool on, press the variable speed switch (1).
- For continuous operation, press the variable speed switch (1), press the lock-on button
(2) and release the variable speed switch.
- To switch the tool off, release the variable speed switch. To switch the tool off, when in
continuous operation, press the variable speed switch once more and release it.
Variable Speed Control
Variable speed is controlled through the variable speed switch (1). The tool speed
depends on how far you depress the switch. For best results, start your cut by gently
squeezing the trigger (slow speed) and gradually speed up (squeeze trigger more) as you
move through your cut.
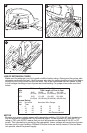
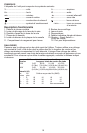
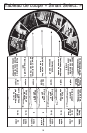
Setting the desired cutting mode (Smart Select
)(g. D)
To select the proper orbital action for the type of material that you are cutting, follow the
steps below:
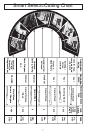
Step 1 - Turn the dial (10) as shown in figure D to the appropriate icon. Refer to the chart
on page 7 for descriptions of the 7 different positions.
Step 2 - Insert the proper blade based on the chart mentioned above.
Step 3 - Perform the cut.
NOTE: These settings are initial recommendations. Your application may work
best with different settings. Test these positions on similar material prior to making
nished cut and adjust selections for desired results.
Connecting a vacuum cleaner to the tool
A hose adaptor (not supplied) is available at extra cost through your nearest Black
& Decker service center. Insert the hose adaptor into the opening at the back of the saw.
Connect a vacuum cleaner hose (not supplied) to the hose adapter.


Find Your Products By Category
- TV and Video
- Communications
- Personal Care
- Portable Media
- Computer Equipment
- Home Audio
- Household Appliance
- Car Audio and Video
- Kitchen Appliance
- Fitness & Sports
- Musical Instruments & Equipment
- Power Tools
- Marine Equipment
- Lawn and Garden
- Automotive
- Photography
- Video Game
- Laundry Appliance
- Outdoor Cooking
- Baby
- Cell Phone
Please Login
