
3.0
Owner's of the Black & Decker Trimmer ST4500 gave it a score of 3.0 out of 5. Here's how the scores stacked up:
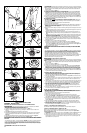
CAUTION: Inspect area to be trimmed and remove any wire, cord, or string-like objects
which could become entangled in the rotating line or spool. Be particularly careful to avoid any
wire which might be bent outwardly into the path of the tool, such as barbs at the base of a
chain link fence.
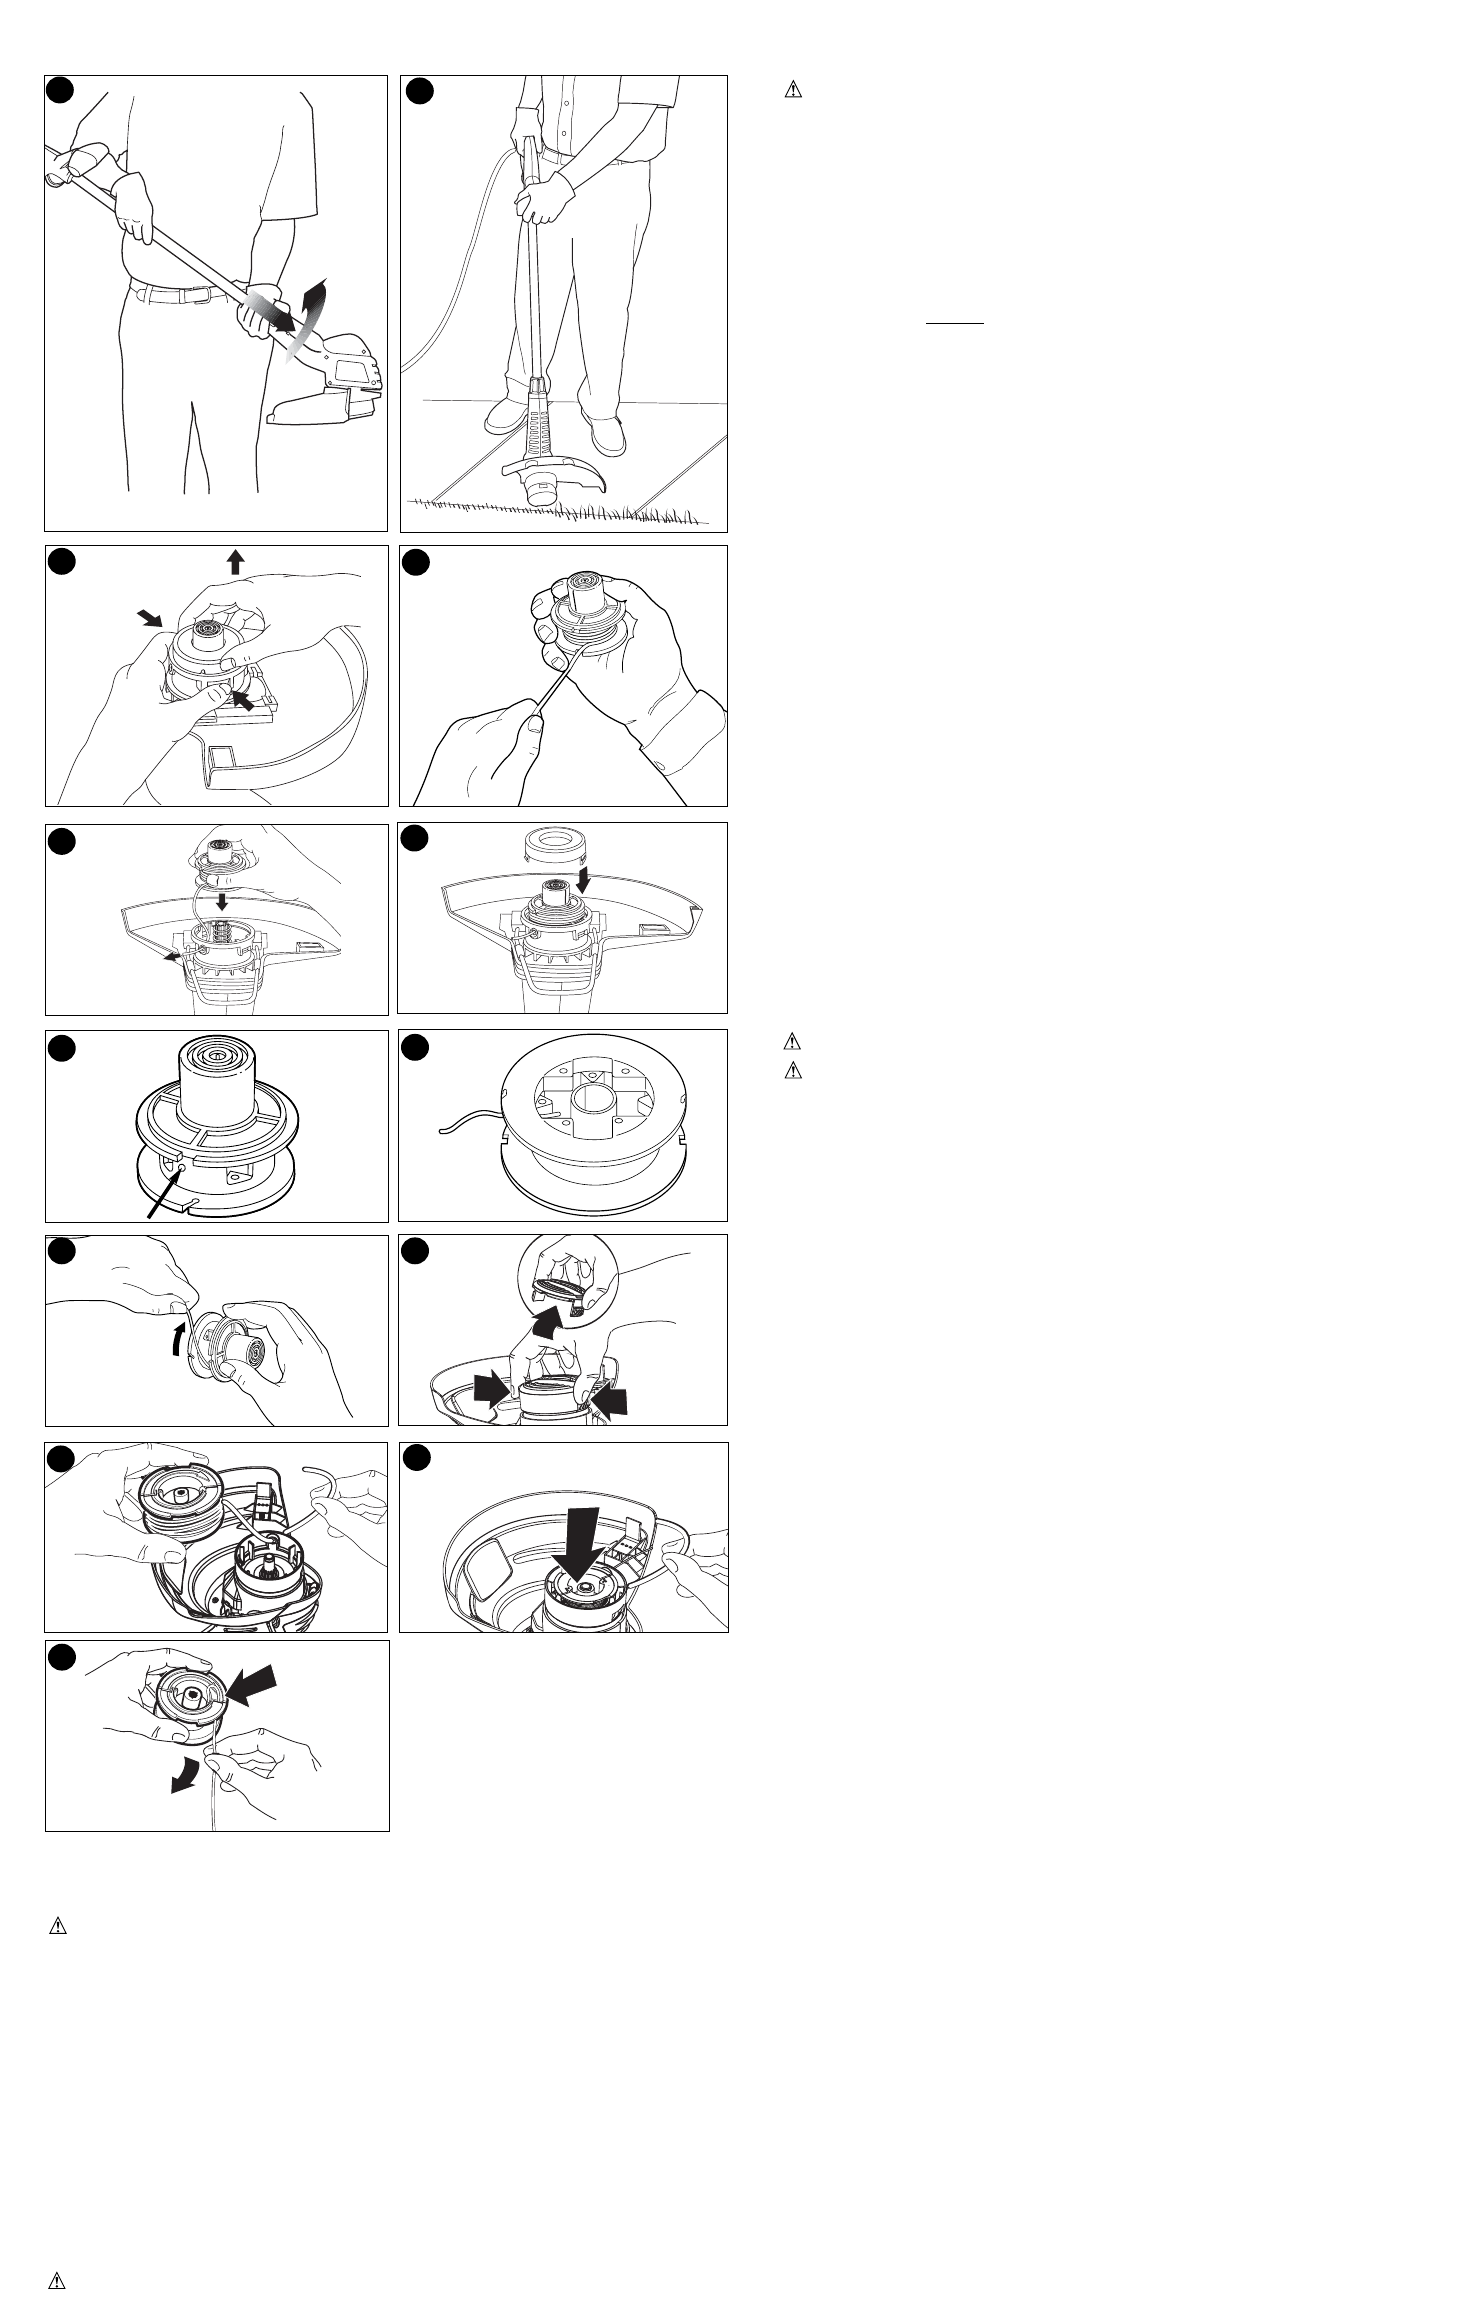
1. Angle unit as shown in figure 7.
2. Slowly swing trimmer side-to-side as shown in figure 8.
3. To convert for maintenance edging, turn off the tool. Holding the trimmer (as shown in
figure 9) with one hand by the auxiliary handle, grasp the trimmer head collar, push in
direction of arrow and rotate the trimmer head clockwise (when viewed from the switch
end) until it stops, (half turn), release your hand. The tool is locked in the edger position.
4. To operate as a maintenance edger, position trimmer above sidewalk as shown in figure 10.
5. Return to trimming position by turning the tool off, pushing in direction of arrow and rotat-
ing the trimmer head counter clockwise until it stops.
RELOADING LINE ST4500
USE ONLY .065 in. (1.65mm) DIAMETER NYLON MONOFILAMENT LINE. Heavier line
will overload the motor and cause overheating. This line is available at your local dealer or
authorized service center.
Do not use fishing line or other lines that are not recommended.
1. Unplug extension cord at trimmer.
2. Remove the bump cap by pulling up while depressing the two release tabs on the sides of
the hub at the points shown in figure 11.
NOTE: It may be necessary to pull up on the cap while depressing the release tabs one
side at a time.
3. Remove any broken cutting line, wrap the remaining line tight and reinsert spool into hub as
follows.
a.Wind the line tight enough so that it is all below the edges of the flanges on the spool. If it
extends past the flanges, it won’t fit into the hub.
b.Place the loose end of the cutting line through the gap in the spool flange as shown in
figure 12. (Either gap will do but try to leave yourself about 3 or 4 inches of line to work
with.)
c.Holding the line in the gap, insert the end through the eyelet in the hub and slip the spool
into the hub, as shown in figure 13.
Make sure the spring is still in place in the hub. If the spool does not slip into the hub easily,
press gently and pull straight out on the cutting line that protrudes through the eyelet.
4. Once the spool drops into the hub, align the release tabs on the shroud with the slots in
the hub as shown in figure 14 and press the shroud into place. Be sure that both release
tabs snap into place.
5. To replace the line on a spool, follow the steps below
a.Locate, on the empty spool, one of the two small holes shown in figure 15.
b.Insert the end of the line no more than 1/8 in. into the hole and begin winding the line
around the spool (figure 16). Be sure to wind the line in the direction of the arrow in figure 17.
Do not overfill spool. The spool holds 20 feet (6 m) of line.
c.Perform steps 3 and 4 above.
OPERATING INSTRUCTIONS FOR CATALOG # ST7600, ST7700 AUTO FEED
SYSTEM
LINE FEED
Your trimmer uses .065 in. (1.65 mm) diameter, ROUND nylon line to cut grass and weeds
quickly and easily. During use, the tip of the nylon line will become frayed and worn and the
special self feeding line hub will automatically feed and trim a fresh length of line. Cutting
line will wear faster and require more feeding if the cutting or edging is done along
sidewalks or other abrasive surfaces or heavier weeds are being cut. The advanced
automatic line feeding mechanism senses when more cutting line is needed and feeds and
trims the correct length of line whenever its required. DO NOT BUMP unit on ground in
attempt to feed line or for any other purposes.
CAUTION: ALWAYS USE EYE PROTECTION.
CAUTION: Inspect area to be trimmed and remove any wire, cord, or string-like objects
which could become entangled in the rotating line or spool. Be particularly careful to avoid any
wire which might be bent outwardly into the path of the tool, such as barbs at the base of a
chain link fence.
1. Angle unit as shown in figure 7.
2. Slowly swing trimmer side-to-side as shown in figure 8.
3. To convert for maintenance edging, turn off the tool. Holding the trimmer (as shown in
figure 9) with one hand by the auxiliary handle, grasp the trimmer head collar, push in
direction of arrow and rotate the trimmer head clockwise (when viewed from the switch
end) until it stops, (half turn), release your hand. The tool is locked in the edger position.
4. To operate as a maintenance edger, position trimmer above sidewalk as shown in figure 10.
5. Return to trimming position by turning the tool off, pushing in direction of arrow and rotat-
ing the trimmer head counter clockwise until it stops.
CLEARING JAMS AND TANGLED LINES
From time to time, especially when cutting thick or stalky weeds, the line feeding hub
may become clogged with sap or other material and the line will become jammed as a
result. To clear the jam, follow the steps listed below.
1. Press the release tabs on the line hub cap, as shown in figure 18 and remove the cap
by pulling it straight off.
2. Lift the spool of nylon line out of the hub and clear any broken line or cutting debris from
the spool area. (If you plan to replace the spool or rewind it, this is the place to do so,
otherwise, move on.)
3. Unwrap about one foot (30 cm) of line to ensure that it’s undamaged. If it is OK rewind it
and insert the line end through the eyelet in the spool hub as shown in figure 19. Pull
4 in. (10 cm) of the line through the hole and maintain tension while placing the spool
down into the hub with the arrow up, as shown in figure 20.
4. Press the spool down GENTLY and rotate it until you feel it drop into place. (When in
place, the spool will turn a few degrees left and right freely). Take care to keep the line
from becoming trapped under the spool.
5. Snap the hub cap back on, and power the tool on. In a few seconds or less you’ll hear
the nylon line being cut automatically to the proper length.
SPOOL OR LINE REPLACEMENT
USE ONLY .065 in. (1.65mm) DIAMETER NYLON MONOFILAMENT LINE. Heavier line
will overload the motor and cause overheating. This line is available at your local dealer or
authorized service center.
Do not use fishing line or other lines that are not recommended.
1. Perform step 1 above to remove cap.
2. Remove the spool from the tool and remove and discard all line on the spool.
3. Choose either OPTION 1 or OPTION 2 below for spool or line replacement. Perform
steps listed under Option 1 or Option 2, then continue with steps 4 through 6 below.
4. Insert the line end through the eyelet in the spool hub, as shown in figure 19. Pull the
line through the hole to maintain tension while placing the spool down into the hub, as
shown in figure 20.
5. Press the spool down GENTLY and rotate it until you feel it drop into place. (When in
place, the spool will turn a few degrees left and right freely). Take care to keep the line
from becoming trapped under the spool.
6. Snap the hub cap back on, and power the tool on. In a few seconds or less you’ll hear
the nylon line being cut automatically to the proper length.
OPTION 1: ACCESSORY REPLACEMENT SPOOL
Use Black & Decker replacement spool Model No. AF-100. Discard old spool.
OPTION 2: REWINDING SPOOL USING BULK LINE
Bulk line for your trimmer/edger is available at extra cost from your local dealer or
Black & Decker Service Center. To install bulk line, follow the steps below. (Use .065 in.
diameter ROUND line only)
1. Insert one end of the bulk line into the hole in the spool as shown in figure 21 about 1/2
in. (12 mm).
2. Hold the line in the hole and pull the rest of the line through the slot in the spool.
3. Snugly and evenly wind the bulk line onto the spool in the direction of the arrow on the
spool until the line builds up to the notches in the spool rim. Do not overfill spool. The
spool holds 30 feet (10 m) of line.
SAVE THESE INSTRUCTIONS
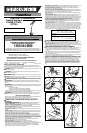
ASSEMBLY INSTRUCTIONS
ATTACHING THE GUARD AND EDGE GUIDE TO THE TRIMMER/EDGER
WARNING: The guard must always be on the tool to protect the user. NEVER
OPERATE TOOL WITHOUT GUARD FIRMLY IN PLACE.
Unplug the tool before attempting to attach the guard.
1. Locate the edge guide and spread it apart as shown in figure 1.
2. Attach the edge guide to the housing by locating the two ends into the holes in the
housing.
3. See figure 2 for edge guide assembled on the trimmer.
4. Remove the guard attachment screw from the guard. Slip the guard onto the trimmer
housing and lineup the screw hole in the guard with the screw hole in the housing
(figure 3).
5. Insert the guard attachment screw to secure the guard in place as shown in figure 4.
6. Attach extension cord to cord retainer as shown in figures 5 & 6.
OPERATING INSTRUCTIONS FOR CATALOG # ST4500 BUMP FEED TRIMMER
LINE FEED
Your trimmer uses .065 in. (1.65 mm) diameter, ROUND nylon line to cut grass and weeds
quickly and easily. Cutting line will wear faster and require more feeding if the cutting or
edging is done along sidewalks or other abrasive surfaces or heavier weeds are being cut.
As you use the trimmer, the string will get shorter due to wear. Gently bump the unit on the
ground and the line will feed.
CAUTION: ALWAYS USE EYE PROTECTION.
9
10
11
12
13
14
15
16
1817
19
20
21


Find Your Products By Category
- TV and Video
- Communications
- Personal Care
- Portable Media
- Computer Equipment
- Home Audio
- Household Appliance
- Car Audio and Video
- Kitchen Appliance
- Fitness & Sports
- Musical Instruments & Equipment
- Power Tools
- Marine Equipment
- Lawn and Garden
- Automotive
- Photography
- Video Game
- Laundry Appliance
- Outdoor Cooking
- Baby
- Cell Phone
Please Login
