
0
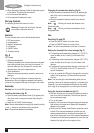
Owner's of the Black & Decker Yard Vacuum Black & Decker Yard Vacuum gave it a score of 0 out of 5. Here's how the scores stacked up:


4
ENGLISH
(Original instructions)
u When disposing of batteries, follow the instructions given
in the section “Protecting the environment”.
u Do not incinerate the batteries.
u Do not expose the batteries to water.
Warning Symbols
The following symbols are found on the tool:
;
Warning! To reduce the risk of injury, the user
must read the instruction amnual.
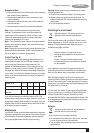
Features
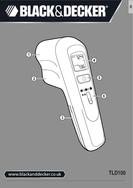
This tool includes some or all of the following features.
1. LED spot projector
2. Infrared sensor
3. Battery Compartment
4. LCD screen
5. ON/OFF button
6. Threshold setting
Fig. A
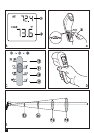
LCD Display.
7. Reference temperature
Shows the temperature of the area where the instrument
was initially pointed when you turned on the power. To
reset the reference, turn the power off, aim at a new
reference spot, and turn the power back on.
8. Scan temperature
Shows the average temperature across the area you're
aiming at.
Note: The Thermal Leak Detector compares these two
temperatures. When the difference exceeds the threshold
you've set, the projected LED spot will change to red or blue.
Assembly
Warning! Use 9V size (6LR61) alkaline batteries only.
Installing the battery (g. B)
u Open the battery compartment cover (3) by pressing the
tabs of the cover in towards the center and pulling the
cover out.
u Insert one 9V (6LR61) alkaline battery.
Note: Always insert batteries correctly with regard to polarity
(+ and –), marked on the battery and the equipment.
Note: Remove dead batteries immediately.
Changing the temperature display (g. B)
u Open the battery compartment cover (3) by pressing the
tabs of the cover in towards the center and pulling the
cover out.
u Slide the temperature selection switch to the desired
position.
Note:
Will set your thermal leak detector to the
Fahrenheit scale.
Note:
Will set your thermal leak detector to the
Centigrade scale.
Use
Switching On and Off
u Press the ON/OFF button to turn the unit on.
u Press the ON/OFF button to turn the unit off.
Note: The unit will automatically turn off after 10 minutes.
Setting the threshold for colour change (g. C)
u For detecting small temperature changes of 1º F (0.5º C),
move the slider to the 1º mark (9) on the back of the
detector.
u For detecting medium temperature changes of 5º F (3º C),
move the slider to the 5º mark (10) on the back of the
detector.
u For detecting large temperature changes of more than 10º
F (5.5º C), move the slider to the 10º (11) mark on the
back of the detector.
u If you do not want the LED spot to change color, move the
slider to the top position (12) where the color spots are
X-ed out.
Note: You can change the threshold setting while you are
scanning. If the color is changing erratically, try increasing the
threshold. If you see a temperature difference on the screen,
but the light is not changing color, try reducing the threshold.
Using the thermal leak detector (g. D)
u Hold the unit as shown. Aim near the location you want to
scan for a draft or thermal leak. This initial aim point will
be your reference target.
u Turn on the power.
u Keep the unit aimed at the reference target until the green
light shines on the target and a Reference Temperature
appears on the screen.
u Slowly scan the Thermal Leak Detector across the area of
interest. If the scanned temperature is hotter than the
reference temperature by more than the threshold, the
light will turn from green to red. If the scanned temperature
is colder than the reference temperature by more than the
threshold, the light will turn from green to blue.


Find Your Products By Category
- TV and Video
- Communications
- Personal Care
- Portable Media
- Computer Equipment
- Home Audio
- Household Appliance
- Car Audio and Video
- Kitchen Appliance
- Fitness & Sports
- Musical Instruments & Equipment
- Power Tools
- Marine Equipment
- Lawn and Garden
- Automotive
- Photography
- Video Game
- Laundry Appliance
- Outdoor Cooking
- Baby
- Cell Phone
Please Login
