

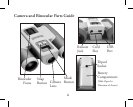
0
Owner's of the Bushnell Binoculars ImageView gave it a score of 0 out of 5. Here's how the scores stacked up:


14
Transferring e Photos & Videos to Your PC continued
3. e LCD display will indicate “STO”, and the ImageView will be recognized as a standard “USB
Mass Storage” device. is means that the camera files can be easily viewed, edited, or copied to your
hard drive, just as if they were stored on an external hard drive or a CD-ROM.
4. (is step is not required with Windows XP, simply use the options in the pop-up window to view, copy
or edit your photos). Open My Computer or Windows Explorer. e camera will be seen as a new
“Removable Disk” with an unused drive letter assigned to it. Double click this new “Disk” icon, open
the “DCIM” folder inside, then the folder(s) inside that (“100MEDIA” ,etc). Your photos/videos are
the files inside-they have the prefix “IMG__” followed by a number, same as seen earlier on the camera’s
display when you review photos. Single clicking any file should show a small preview image.
5. Click “Edit>Select All” (or click on one photo, contol+click to select multiple photos), then
“Edit>Copy to Folder” (in Windows menus). Select an existing folder on your hard drive, such as “My
Pictures”, or create a new folder (“Hawaii Vacation”, etc), then click “OK” to transfer copies of the
photo files you want.
6. After the photos are transferred to your hard drive, you can disconnect the camera. Windows 2000
may produce a screen warning that you have disconnected a USB device without stopping or ejecting
the “disk” first (your photo files will not be harmed). If so, check the box that adds an icon to your
system tray or taskbar. en next time you finish transferring photos, you can click that icon first, and
“Stop the USB Mass Storage Device” before disconnecting the camera. (On Mac computers, you should
“eject” the “disk” that appeared on your desktop when the camera was connected.)


Find Your Products By Category
- TV and Video
- Communications
- Personal Care
- Portable Media
- Computer Equipment
- Home Audio
- Household Appliance
- Car Audio and Video
- Kitchen Appliance
- Fitness & Sports
- Musical Instruments & Equipment
- Power Tools
- Marine Equipment
- Lawn and Garden
- Automotive
- Photography
- Video Game
- Laundry Appliance
- Outdoor Cooking
- Baby
- Cell Phone
Please Login
