
0
Owner's of the Bushnell Hunting Equipment Bushnell Hunting Equipment gave it a score of 0 out of 5. Here's how the scores stacked up:

15
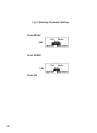
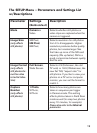
EXAMPLES-Changing the Settings of Some Common
Parameters
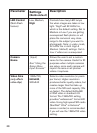
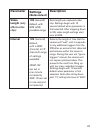
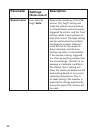
Following this page, you will find tables listing all of the parameters found in
the SETUP Menu, along with their possible settings (or range of settings),
and a detailed description of what the parameter controls and what
the settings do. If you read the previous section detailing how to select
parameters and change their settings, you should be able to dive right in, find
the parameter(s) you want, and setup the camera to suit your preferences.
But maybe you’d rather walk through an example or two first:
To change any parameter’s setting, always start with the power switch in the
SETUP position. After the LCD comes on, press the MENU key.
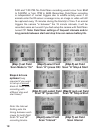
The first parameter you will see when you first enter the SETUP Menu is
“Mode”. To change it from its default setting of “Camera” (still photos) to
“Video” (shoot video clips), press the DOWN key to select the “Video”
setting. Press the OK key to “Execute” (Set) the new setting you’ve selected
for this parameter.
Now press the RIGHT key to move to another parameter in the Menu.
Pressing it three times will take you to “Capture Number”. Try using the UP
and DOWN keys to scroll through the range of settings, then press OK to
lock in your setting for the number of photos the camera takes each time it's
triggered.
Pressing the RIGHT key until you reach the last menu item, you'll see the
“Default Set” parameter. Highlight or select “Execute” (using UP or DOWN)
and press OK to restore all parameters (including the Mode and Video
Length parameters you changed a minute ago) back to their original factory
default settings. The default settings for each parameter are indicated in bold
type in the SETUP Menu tables on the next several pages.
Be sure to set the current date and time, using the “Set Clock” parameter, if you
choose to change the “Time Stamp” parameter setting to “On” since that will tell
the camera to imprint the date and time on each of the images it captures.


Find Your Products By Category
- TV and Video
- Communications
- Personal Care
- Portable Media
- Computer Equipment
- Home Audio
- Household Appliance
- Car Audio and Video
- Kitchen Appliance
- Fitness & Sports
- Musical Instruments & Equipment
- Power Tools
- Marine Equipment
- Lawn and Garden
- Automotive
- Photography
- Video Game
- Laundry Appliance
- Outdoor Cooking
- Baby
- Cell Phone
Please Login
