
0
Owner's of the Gemini DJ Equipment TABLE TOP SYSTEM gave it a score of 0 out of 5. Here's how the scores stacked up:

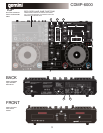


FUNCTIONS: (CONTINUED)
JOG WHEEL: The JOG WHEEL controls three JOG MODES, these
modes are PITCH BEND, SEARCH and SCRATCH EFFECT (see JOG
MODE BUTTON and SCRATCH BUTTON below).
JOG/ SCRATCH MODE: The JOG MODE button allows you to choose be-
tween (2) of the (3)JOG MODES a JOG MODE LEDindicator located be-
tween the JOG MODE and SCRATCH BUTTONS indicates which mode
is selected. When the LED is NOT ILLUMINATED the wheel is in PITCH
BEND mode and can be used to speed up or slow down the track (depend-
ing on its PITCH setting).Press the JOG MODE button once and the JOG
MODE LED will illuminate indicating the JOG WHEEL is in SEARCH
MODE, you may then use the wheel to skip forward or backward in the
song. The SCRATCH button engages the units SCRATCH mode, once
pressed the JOG MODE LED will flash indicating the unit is in SCRATCH
MODE you may then use the JOG WHEEL to manipulate the simulated
scratch.You may press the SCRATCH button or the JOG MODE button at
any time to exit SCRATCH mode.
DISPLAY: The DISPLAY shows the playback search bar, track number,
pitch value, pitch bend, single on/off (off for continuous play), loop, BPM,
play/pause, time display, repeat and USB/CD modes as well as track and
folder name and CD TEXT or track number as well as two different TIME
display modes (SEE TIME BELOW). Time is measured in minutes, sec-
onds and frames.
TIME:The TIME BUTTON switches the time display between two available
sources, these two are TIME ELAPSED on the track, which counts how
long the track has been playing and TIME REMAINING ON TRACK which
counts down the time that is left before the end of the track.
SINGLE: Pressing the SINGLE button engages SINGLE mode, this mode
will play one song and then stop. Pressing the SINGLE button again will
then activate CONTINUOUS mode causing the unit to play continuously
until the last track on the CD or currently selected FOLDER (See TRACK
SELECTION ROTARY for additional functions).
BPM: Press and hold the BPM button to turn on the BPM read out, once
on you may TAP the button to the beat of the music, after a few TAPS the
display will read out the average BEATS PER MINUTE of the track.If there
is a BPM value present in the MP3’s ID3-tag it will be displayed, if there is
none it will display 0 until you TAP the value in.
BACK: The BACK button is used when navigating through folders. When
pressed ONCE it will navigate one level BACK, To navigate to the ROOT
level or beginning PRESS and HOLD the BACK button.
PITCH: Press and hold the PITCH button to activate the PITCH
CONTROL SLIDE. The PITCH button has three settings 8%, 12% and
24% and can be toggled by pressing the PITCH button once for each set-
ting. Press and hold the PITCH button again to deactivate this mode.
PITCH CONTROL SLIDE: This slide, when pushed towards the bottom of
the unit (+), increases the tempo of playback.When the slide is pushed to-
wards the top of the unit (-), the tempo of playback is decreased.
21
PITCH BEND: Pushing the PITCH BEND BUTTONS will automati-
cally bend the pitch up to +24% or bend the pitch down to -24% de-
pending on the setting of the PITCH BUTTON. Releasing the buttons
will return the pitch to the original pitch setting.You can use this func-
tion to match the beat when mixing from one song to another.
LOOP SECTION:A LOOP repeats the section between the entry point
(IN) and the exit point (OUT). To set a loop while the unit is playing,
start by pressing the IN BUTTON (it will light up) and when you reach
the desired end loop point press the OUT BUTTON (it will also light up
and both will flash). The loop will continue playing until you press the
OUT BUTTON again allowing the music to continue from that point on,
to re-engage the loop you must press the RELOOP BUTTON. When
you have released your loop the both lights will stay ON to indicate that
your loop is stored in the CDMP-6000 memory.Pressing the IN BUT-
TON again while the unit is playing will erase the previously saved loop
while saving your new loop entry point. Press OUT to exit the loop and
save a new complete loop.Press RELOOP to return to the beginning
of the previously saved loop from normal play.Press RELOOP repeat-
edly to cause the loop to stutter.
PLAY/PAUSE: Each press of the PLAY/PAUSE BUTTON causes the
operation to change from PLAY to PAUSE or from PAUSE back to
PLAY. The PLAY/PAUSE BUTTON remains lit when in PLAY mode,
while it blinks in PAUSE mode.
CUE: With the CDMP-6000, creating and memorizing cue points is
quick and easy.By default, when there is no CUE Point set (or memo-
rized), pressing the CUE button returns the unit to the beginning of the
track (0:00.00) and pauses.To set a CUE Point during playback at a
time of your choice, simply press PAUSE, and then use the JOG
WHEEL to make any adjustments by frame.When Play is pressed to
resume playback, the CUE POINT will be stored.
REPEAT: Press the REPEAT button once to engage the ALL setting
which will repeat all the tracks on the CD or selected FOLDER. Press
the REPEAT button again to engage the (1) setting which will repeat
just the selected track. Press REPEAT a third time to disengage the
repeat function.
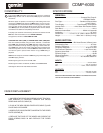
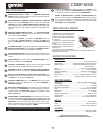
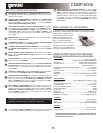
USB PORT The USB port allows the connection of any USB memory
stick*.
USB/CD SELECT BUTTON The USB/CD select button allows you to
toggle from the CDMP-6000 internal CD drive and the memory stick*
connected to the USB port.
26
24
25
22
23
5
13
14
15
16
17
18
19
20
CDMP-6000
11
12


Find Your Products By Category
- TV and Video
- Communications
- Personal Care
- Portable Media
- Computer Equipment
- Home Audio
- Household Appliance
- Car Audio and Video
- Kitchen Appliance
- Fitness & Sports
- Musical Instruments & Equipment
- Power Tools
- Marine Equipment
- Lawn and Garden
- Automotive
- Photography
- Video Game
- Laundry Appliance
- Outdoor Cooking
- Baby
- Cell Phone
Please Login
