
0
Owner's of the AudioSource Stereo Equalizer 10-Band Graphic Equalizer gave it a score of 0 out of 5. Here's how the scores stacked up:
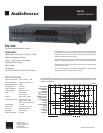

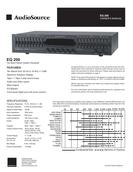
EQ 200
OWNER’S MANUAL
13970 SW 72nd Ave. Portland, OR 97223 • 503.914.4688 • www.audiosource.net
3
A Few Words about Graphic Equalizers
Thank you for choosing this AudioSource EQ 200 Graphic Equalizer. Used correctly, a Graphic Equalizer is a powerful tool for very detailed control
over the sound of your speakers, far more than available from simple tone controls. With the EQ 200, you can enhance the sound of older recordings,
alter instrumental and vocal balance to suit your own tastes, make “Custom Equalized” recordings, and a multitude of other uses. However, like any
tool, excessive or incorrect adjustments can yield very unpleasant results, and can overload your amplifiers and speakers. Improvement of sound
quality, particularly in the extreme bass and treble regions, is completely dependent upon the quality of the other equipment you are using in your
system. Limited amplifier power and speakers with a limited frequency range are the greatest barriers to achieving accurate, flat response. If you
detect any distortion in the bass or treble regions while boosting the EQ 200’s sliders in these areas, back off immediately, as you are probably over
taxing either your amplifier or your speakers. Please read this manual before use, and follow our suggestions and basic guidelines for the best sound.
Having said that, be assured that “good sound” is a relative thing… We all have different opinions and tastes. The EQ 200 is designed to allow you to
change the sound of your speakers to suit your own musical choices. On the first page of this manual is a chart designed to show you the frequency
content and range for a variety of musical instruments. This chart will help you find the proper sliders to adjust to achieve the desired results.
Basic Guidelines
Before adjusting the sliders, it is VERY IMPORTANT to clearly define your objectives. Without this consideration before adjustment takes place, it will
be very difficult to attain pleasing results. Carefully listen to your system – ask yourself “What DON’T I like about the sound?” If the answer is “I want
more Bass”, you have two ways to accomplish this. Choice #1 – Raise or “Boost” the sliders for the lowest frequencies – on both channels – Left &
Right. Choice #2 – Lower or “Cut” the sliders on the midrange and higher frequencies. The end result will be the same – You’ll have more bass.
Conversely, if you’d like to hear more High Frequencies, you have two ways to accomplish this. #1 – “Boost” the sliders for the highest frequencies –
on both channels Left & Right. #2 – “Cut” the sliders of the Midrange and Bass frequencies.
As you can see, there are a variety of ways to accomplish your objectives. Be aware that due to the nature of all equalizer sliders, you will find that
movement of any given slider will also have some effect on the setting of the sliders adjacent to either side of it. Experiment – let your ears decide
what sounds best, but try to have a clear objective before you begin. One suggestion: avoid the “Boost – Boost Syndrome”… avoid “Boosting” on
frequency area too much, by “Cutting” another frequency area. Don’t just radically boost everything- it will add noise to the system, and overtax your
other components. Subtle, careful equalization will make a huge improvement in the overall sound of your system. Enjoy your EQ 200, and if you have
any questions, we are here to help. You can call AudioSource at 877.715.5439, Monday through Friday, 7:00am to 5:30pm Pacific Time.
1
2
3
4
5
6
7
9
8
1. Power
Press this button to activate the power on the EQ 200. The LED will be
green to show power is “On”. Push the button again to turn “Off” the
EQ 200. The LED will be red to show this selection.
2.
3.
Tape 1-2 / Tape 2-1
Audio / Video
This button selects between two input sources. Press the button “In”
to select an Audio input source, such as a CD player, or MP3 player.
The LED will be green to show this selection. Leave the button “Out”
to select a Video input source, such as a DVD player or VCR. The
LED will be red to show this selection.
Note: The EQ 200 equalizes the sound of these various components.
At no time does the EQ 200 alter the picture, and no “Video – Type”
connections are included. These inputs will accept any “Line Level”
source, such as a CD player, MP3 player, tape deck, VCR, etc.
This button allows you to make a tape copy of “Dub” between the two
cassette decks. Press this button “In” to “Dub” from Tape 1 to Tape 2.
The LED will be green to show this selection. Leave this button in the
“Out” position to “Dub” from tape 2 to Tape 1. The LED will be red to
show this selection. When the “Line / Tape” switch is “Out”, or in the
TAPE position , this “Tape 1-2 / Tape 2-1” switch will select which tape
deck is to be listened to. Leave it “In” for Tape 1, “Out” for Tape 2.
4. EQ / Bypass
Use this switch to instantly compare the “equalized” and “un-equalized”
sound. Press this button “In” to hear the result of your equalization curve
.
The LED will be green to show this selection. When this button is “In”
the red LEDs in all twenty sliders will light up. Leave this switch in the
“Out” position to bypass the equalization of the EQ 200. The LED will
be red to show this selection, and the red LEDs in the sliders will
disappear at this time.
5.
6.
EQ Rec
Line / Tape
This button selects between input sources. In the “In” position, the
“Line Input” is chosen. The LED will be green to show this selection.
Leave this button in the “Out” position to hear the “Tape Input”. The
LED will be red to show this selection.
EQ Record. Press this button to make a tape copy of with the equalization
curve you have just set. The LED will be green to show this selection.
This can be useful when making a cassette tape to play in your car.
A well equalized tape can improve the sound from smaller, less
expensive car stereo speakers. With this button in the “Off” position,
the cassette tape copy will be recorded without equalization. The LED
will be red to show this selection.
Using the Controls
9


Find Your Products By Category
- TV and Video
- Communications
- Personal Care
- Portable Media
- Computer Equipment
- Home Audio
- Household Appliance
- Car Audio and Video
- Kitchen Appliance
- Fitness & Sports
- Musical Instruments & Equipment
- Power Tools
- Marine Equipment
- Lawn and Garden
- Automotive
- Photography
- Video Game
- Laundry Appliance
- Outdoor Cooking
- Baby
- Cell Phone
Please Login
