
0
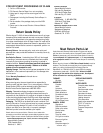
Owner's of the Atwood Mobile Products Water Heater Water Heater Exchanger gave it a score of 0 out of 5. Here's how the scores stacked up:

27
FLUSHING YOUR WATER HEATER TO REMOVE
THE ROTTEN EGG ODOR
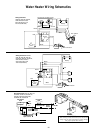
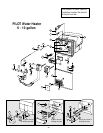
1. Turn off your main water supply. Drain you water
heater tank. Reinstall drain plug. Remove the
pressure-temperature relief valve. With a funnel
use 4 parts white vinegar to two parts water. (In a
6 gallon tank that would be 4 gallons vinegar to 2
gallons water).
2. Cycle the water heater, letting it run under normal
operation 4-5 times. At no time do you remove the
vinegar from the tank Once this has been
completed, remove the drain plug and drain the
water heater.
3. After thoroughly draining the tank, to remove the
sediment, flush the water heater.
If you elect to use air pressure, it may be applied
either through the inlet or outlet on the rear of the
tank or applied through the pressure-temperature
relief valve. Remove the pressure-temperature
relief valve and insert your air pressure through
the pressure-temperature relief valve coupling. In
either case, with the drain valve open, the air
pressure will force the remaining water out of the
unit.
If air pressure is unavailable, your unit can be
flushed with fresh water. Fresh water should be
pumped into the tank either with the onboard
pump or external water pressure. External
pressure may be hosed into the unit either
through the inlet or outlet found on the rear of the
tank or the pressure-temperature relief valve
coupling located on the front of the unit.
Continue this flushing process for approximately
five minutes allowing ample time for the fresh
water to agitate the stagnant water on the
bottom of the tank and forcing the deposits
through the drain opening.
4. Upon completion of the steps above, replace the
drain plug and the pressure-temperature relief
valve.
5. Refill tank with fresh water that contains no
sulphur.
The Atwood water heater is designed for use in a
Recreation Vehicle. If you use your vehicle frequently
or for long periods of time, flushing the water heater
several times a year will prolong the life of the storage
tank.
WINTERIZING INSTRUCTIONS
1. Turn off your main water supply, that is, your pump or
your water hook up source.
2. Drain your water heater inner tank. Upon doing so, you
will note that, due to the location of the drain plug,
approximately two quarts of water will remain in the
bottom of the tank. This water contains most of the
harmful corrosive particles. If while draining the unit, you
note that it is flowing sporadically or trickling, instead of
flowing steadily, we recommend one of two things. You
should first open your relief valve to allow air into the
tank and secondly, take a small gauge wire or coat
hanger device and prod through the drain opening to
eliminate any obstructions.
3. After thoroughly draining the tank, you should then flush
it with air pressure or fresh water. If you elect to use air
pressure, it may be applied either through the inlet or
outlet on the rear of the tank. It may also be applied
through the relief valve part. In this case, it will be
necessary to first remove the relief valve support flange.
In either case, with the drain valve open, the air pressure
will force the remaining water, along with the corrosive
particles, out of the unit. However, if air pressure is
unavailable, your unit can be flushed with fresh water.
Fresh water should be pumped into the tank either with
the assistance of the on-board pump or with the
assistance of external water either through the inlet or
outlet found on the rear or the relief valve coupling
located on the front of the unit. Continue this flushing
process for approximately five minutes allowing ample
time for the fresh water to agitate the stagnant water on
the bottom of the tank and thus forcing the deposits
through the drain opening.
4. Upon completion of the steps above, replace the drain
plug and the pressure-temperature relief valve.
5. After this procedure, there will be approximately two
quarts of water left at the bottom of the inner tank.
Should this water freeze it will not cause any splitting of
the tank.


Find Your Products By Category
- TV and Video
- Communications
- Personal Care
- Portable Media
- Computer Equipment
- Home Audio
- Household Appliance
- Car Audio and Video
- Kitchen Appliance
- Fitness & Sports
- Musical Instruments & Equipment
- Power Tools
- Marine Equipment
- Lawn and Garden
- Automotive
- Photography
- Video Game
- Laundry Appliance
- Outdoor Cooking
- Baby
- Cell Phone
Please Login
