

0
Owner's of the Bushnell Telescope Image View gave it a score of 0 out of 5. Here's how the scores stacked up:


11
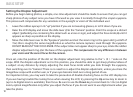
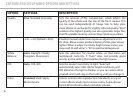
TAKING STILL PHOTOS
Taking Still Photos
After completing the basic setup as described in the previous pages, you are ready to take a photo:
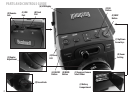
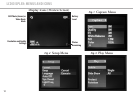
With the ImageView scope securely mounted on a tripod, raise the LCD display 1. (G) and briey press and
release the ON/OFF button-the power LED (H) lights and the startup screen is displayed, followed by
the live image from the camera lens. The display also shows the battery condition, number of photos
remaining, and the current resolution/quality settings. Please refer to “LCD Display:Menus and Icons” for
more details.
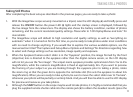
The ImageView scope will default to high resolution and quality settings, as well as “everything on 2.
automatic” when it is turned on for the rst time, so you’re ready to take photos under most conditions
with no need to change anything. If you would like to explore the various available options, see the
manual section titled “The Capture and Setup Menu-Options and Settings” for directions regarding how
to select and change settings such as resolution, image quality and exposure.
When the Eyepiece/Camera select slider is in the “Eyepiece” position, the image formed by the front 3.
(objective) lens is directed to the eyepiece rather than the digital camera sensor, so the LCD display
will not let you see the “live image”. The scope’s zoom eyepiece provides optical zoom from 15x to 45x
magnication, while the camera’s magnication is xed at approximately 22x. If you want to preview
the framing of your subject as you are looking through the eyepiece prior to taking a photo, rotate
the zoom ring so that the green dot is opposite the red index dot (this sets the eyepiece to about 22x
magnication). When you are ready to take a photo, be sure to move the select slider over to “Camera”-
otherwise your photo will be partially or entirely black. And you will then be able to use the LCD display
for preview and review as you take photos.
Although the 4. SNAP button on the scope may be used to take photos, it is highly recommended that you
plug the supplied remote shutter cable into the remote jack (K) to obtain the steadiest results (press the


Find Your Products By Category
- TV and Video
- Communications
- Personal Care
- Portable Media
- Computer Equipment
- Home Audio
- Household Appliance
- Car Audio and Video
- Kitchen Appliance
- Fitness & Sports
- Musical Instruments & Equipment
- Power Tools
- Marine Equipment
- Lawn and Garden
- Automotive
- Photography
- Video Game
- Laundry Appliance
- Outdoor Cooking
- Baby
- Cell Phone
Please Login
