

0
Owner's of the Bushnell Telescope Image View gave it a score of 0 out of 5. Here's how the scores stacked up:


5
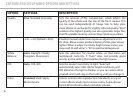
QUICK START GUIDE
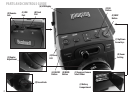
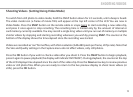
1) To use the ImageView as a standard spotting scope, attach it to a tripod (a small one is included), set the slider (F) to the
“Eyepiece” position, and look through the eyepiece (the rubber eyecup may be rolled down if you wear glasses). The eyepiece
diopter adjustment (J) index dot should be set to the “0” position. Aim the scope at your subject and adjust the focus knob
(O) until it appears sharp. The eyepiece zoom (N) may be set to any magnification desired from 15x to 45x power. Readjust
the focus if you start at low power and zoom up to a higher setting.
2) To setup the digital camera, insert two AA batteries (not included) into the compartment (I), noting the polarity marks. Plug
the included remote shutter cable into the jack (K) to prevent jarring the scope when taking photos. The ImageView scope
has internal memory that will hold about 15 photos (at the default 5MP resolution). However, the internal memory contents
may be lost if the batteries are removed or get very weak during storage, and you may prefer to use an SD card for its much
greater storage capacity. Insert your SD card (face up, notch on right) in the slot (M). The card will click into place. Push the
card in slightly to remove. You may use SD cards (avoid using MMC cards) up to 4 GB capacity. Raise the LCD display (G), and
press the ON/OFF button (A) briefly-the Power LED (H) will light. If the SD card you inserted was previously used in other
devices, format it before taking photos. Note that this will erase all files-on your card (or the internal memory if no card is
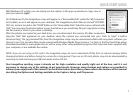
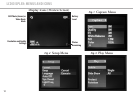
present) -make sure you have backed up any files you wanted to keep. Press the MODE button (B) to enter the Capture menu
(Fig. 1), then press the SNAP button (E) to enter the Setup menu (Fig. 2). “Format” is the first option-press the OK button (D),
then the Down arrow key (C) to select “Execute”, and press OK. Press the MODE button to exit all menus.
3) When you are ready to take a photo, switch the slider (F) to “Camera”. Note: your photos will be black if the slider is left
in the Eyepiece position. The internal camera provides a fixed magnification of about 22x-this corresponds to what you see
through the eyepiece with the zoom ring set to the green dot position (lined up with the red index dot). Adjust the focus
knob if necessary, so the subject appears sharp on the LCD. Press the button on the remote shutter cable to take the photo.
It is also possible to shoot video movies (VGA, 20 fps) with the ImageView scope. Press and hold the SNAP button for 2-3
seconds, then release. A movie film icon appears in the display at top left. Press the remote shutter button to start recording.
A counter at the bottom of the display shows elapsed time. Hold the SNAP button down for a few seconds again to return to
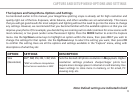
still photo mode. The camera will automatically turn itself off after three minutes of inactivity (this can be changed with the
“Auto Off” options in the Setup menu-see “Capture and Setup Menu-Options and Settings” for more information).


Find Your Products By Category
- TV and Video
- Communications
- Personal Care
- Portable Media
- Computer Equipment
- Home Audio
- Household Appliance
- Car Audio and Video
- Kitchen Appliance
- Fitness & Sports
- Musical Instruments & Equipment
- Power Tools
- Marine Equipment
- Lawn and Garden
- Automotive
- Photography
- Video Game
- Laundry Appliance
- Outdoor Cooking
- Baby
- Cell Phone
Please Login
