

0
Owner's of the Bushnell Telescope Image View gave it a score of 0 out of 5. Here's how the scores stacked up:


6
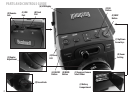
QUICK START GUIDE
Tip: it may be helpful to use the 4x digital zoom feature to check focus on small details. Press the Up arrow key (C) repeatedly -the
display will show the zoom setting, from “1.1x” up to “4.0x” Photos may be taken using the digital zoom, but you will get the best
possible quality by zooming back fully (down to “1.0x”) by pressing the Down arrow key before taking a photo.
4) For greater convenience, you can avoid the need to stop and check focus on the LCD every time you want to switch over to
use the camera function and take a photo by setting up the eyepiece diopter adjustment (J) to compensate for any difference
between the LCD and your vision. To do this, start with the slider in the Camera position and use the focus knob to get a sharp
image of any object with fine detail. Next, switch the slider to the Eyepiece position, and set the zoom ring to the “green dot”
position to match the camera’s magnification. Look through the scope’s eyepiece and rotate the diopter adjustment (do not
adjust the main focus knob) until the image appears sharp to your eye. Note the setting of the diopter index mark (dot). You
will now be free to snap a quick picture anytime you see something interesting through the scope. Simply adjust the focus
knob until the image through the eyepiece is sharp, switch the slider over to “Camera”, and take the photo-it’s not even
necessary to raise the LCD.
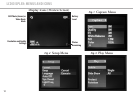
5) To review your photos, press the OK button to enter Play mode. You will see the most recent photo. To step through
previous photos one at a time, press the Down arrow key. The first frame of any stored videos will be displayed-press SNAP
to playback the video. To delete one or more photos/videos, press MODE to enter the Play menu (Fig. 3). The first item on the
menu, “Delete”, is already highlighted. Press the OK button. “Single” is highlighted, meaning you will delete only the currently
displayed photo/video. Press the Down arrow key to select “All” if you wish to delete every photo and video stored on the card
or internal memory. Press OK, then press the Down arrow key to select “Execute”. Press OK to delete the file(s). Press MODE
again and repeat the process if you see another photo you want to delete. When you have finished reviewing or deleting
photos, press OK to return to the normal preview (live image) display.
6) To download your photos/videos to a PC or Mac, connect the supplied cable to the ImageView scope’s USB port (L), then
directly to a main USB port on your computer-do not use front panel/keyboard USB ports or unpowered “hubs”. The LCD will
power on, then go black, and the ImageView scope will be recognized as a standard “USB Mass Storage” device (this may take
several seconds the first time you connect).


Find Your Products By Category
- TV and Video
- Communications
- Personal Care
- Portable Media
- Computer Equipment
- Home Audio
- Household Appliance
- Car Audio and Video
- Kitchen Appliance
- Fitness & Sports
- Musical Instruments & Equipment
- Power Tools
- Marine Equipment
- Lawn and Garden
- Automotive
- Photography
- Video Game
- Laundry Appliance
- Outdoor Cooking
- Baby
- Cell Phone
Please Login
